The base colors for this manicure are Zoya Breezi and Zoya Harley. I used Rimmel Posh Pink and Wet 'n Wild Black Creme for the umbrella. I used Essie Pure Pearlfection for the raindrops (they show up better in real life). I used dotting tools for all the nail art.
Penguins are pretty easy. On my left hand I liked the penguin on the pinkie and thumb. On my right hand I liked the ring finger penguin. I thought the polar bear and the peeking penguin were also sort of cute. I used the nail polish brushes themselves to do almost all of the black penguins and white belly parts. I used this Youtube tutorial to do the dancing penguin. Surprise, it is cuter dancing on youtube.
The base color for this manicure is Wet 'n Wild Megalast I Need a Refresh Mint. I used Zoya Ginessa for the snow. I like the hand where I did "waves of snow" better then the one where I was hoping for something similar to icicles or snow sliding off a roof. I also used Wet 'n Wild Black Creme, Wet 'n Wild I Red a Good Book, Essie Brazilliant, and dotting tools.
This is my second Halloween manicure this year. I used dotting tools, Wet 'n Wild Black Creme, Wet 'n Wild French White Creme, and three layers of Sally Girl glow in the dark polish. With all the layers of glow in the dark polish, the eyeballs are pretty bumpy. I had a hard time making straight line eyeballs on the "snake eyes".
I did most of this manicure with dotting tools. I did the spider web with nail art brushes. I just don't have any luck with nail art brushes. I used Revlon Cherry Berry, Wet 'n Wild Black Creme, Wet 'n Wild French White Creme, and an old silver polish.
This is another manicure that everyone who does nail art tries at least once. I started out with a base of Wet 'n Wild French White cream so the yellow show up better. I painted on two coats of Spoiled Mind Your Own Beeswax to the bottom half and one coat of Wet 'n Wild Dream Poppy to the top. Then I sponged Essie Brazilliant onto the center section to blend the two colors together. Frankly, I could have done a better job with the gradient. I used the Salon Express stamping kit for the palm trees. The palm tree stamp worked really well from that kit. Designs from that kit are hit and miss. The thumb only needed one palm tree. I used a dotting tool and Wet 'n Wild Black Creme for the "land" at the bottom of the nail. I liked them, and I'll do this again.
This is Zoya Daul, the second of three polishes I ordered from the recent Zoya promo. Frankly I'm kind of disappointed. I was hoping Daul would look like it does in this pic:
Picture is from here: http://killerlipgloss.com/zoya-diva-collection-for-fall-2012-swatches/zoya-daul/
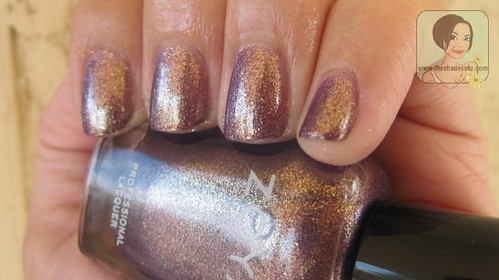
But instead it looks like it does in this picture, which is color accurate:
Picture is from here: http://www.theshadesofu.com/2012/07/zoya-nyfw-2012-diva-collection-swatches.html
The first picture is mine, the other two above are not. Daul is a grape polish with tons of gold glass fleck shimmer. Sounds great on paper, right? Daul looks like a mauve-y bronze in real life. At some angles the grape color is more prominent, but mostly it looks exactly like the picture directly above. This color is not the best on my pale skin. I'm hoping I'll like it better in the summer when I'm "tan". (I'm pale and always wear sunscreen, so it hardly counts as tan.) It is still pretty, just not what I wanted or expected.
EDIT: I tried Daul again in the summer. In direct sunlight Daul looks like the 2nd picture. In fact it looks much better then the second picture. The gold glass fleck shimmer positively glows in the sunlight.
On a whim, I thought I'd try to do a gradient with Zoya Rica. The colors don't go together, but the finishes do. It was kind of cool, despite the clashing colors. Rica, an orange toned coral with gold glass fleck shimmer, did manage to make Daul actually look purple. I had to brush Rica on for the gradient. When I tried to sponge Rica on with a make-up sponge, all that showed up was the gold shimmers and not the color. I did sponge where the two colors meet to blend them together.
After a while, I had to admit that the colors really didn't go together. I was going to remove it, but instead I tried stamping it with Wet 'n Wild Black Creme and Konad M60. It helped disguise the clashing colors.
For this manicure, I used Wet 'n Wild Black Creme and Wet 'n Wild French White Creme. There are too many designs to go into detail on how I did them. Let's just say I used a dotting tool. The flying ghosts on the right thumb and the ghost mouth on the right middle finger are a bit too tadpole shaped. The eyes on the cat should have been almond shaped, but I forgot. Oh well, next time. Over all, I'm pretty pleased. Happy Halloween.
I did these a few weeks ago when it was still summer. Every person who does nail art eventually has to do watermelon nails. It's the law. I started out with Wet 'n Wild French White Creme. I applied French manicure guides to the fingers. Then I sponged Wet 'n Wild Megalast Garden Hose (limited edition color) onto the thumb and tips of the nails with a make-up sponge. The next step was to use a dotting tool to make squiggly lines with Revlon Emerald City on the tips and thumb. I added a coat of Rimmel Speed Dating (very old red polish) to the bottom of the nails. Then removed the French tip guides.
Use a dotting tool and Wet and Wild Black Creme to make the seeds. Add a top coat to protect your nail art. When I do this again, I will probably remove the french tip guided and then sponge the green on the tips so the top line is more diffused and less harsh. Also, the lines on the thumbs should curve slightly inward at the tips and base of the nail to make more of a Watermelon shape.
Happy Memorial Day. (Maybe you aren't supposed to wish people a happy Memorial Day?) I decided to do a poppy manicure for Memorial day. The base color is Sinful Colors Aquamarine. The poppies are Wet 'n Wild Megalast Heatwave and Wet 'n Wild Black Cream. I wanted to use Zoya Poppy for the poppies, but the color wasn't red enough. I followed the tutorial posted below. Cutepolish on Youtube has great nail art tutorials that beginners can do. If you want to play with nail art, check out her channel. I only did two things differently then the video. I used a different base color and instead of using a large dotting tool, I used a small dotting tool and made a series of small dots for the poppy centers.
Whenever I think of poppies, I always think of this scene from the Wizard of Oz. Poppies...poppies...poppies.
Why didn't I take this picture with the Hunger Games book? It is currently out on loan. Catching Fire is the second book in the series. If you haven't read The Hunger Games, you should. In the book they mention a manicure the main character, Katniss, got in her Hunger Games makeover. It is described in the book as flames carefully painted on her nails. Here is how I did my version.
This will all sound way more complicated then it is. I did a yellow/coral/red gradient nail with a make-up sponge. Then I used a dotting tool to add black over the top to make flames.
Step 1- Base coat. I used Essie All in One Base.
Step 2- One coat of white or milky colored ridge filler. Most yellows take several coats. Over a white polish, you need less coats of yellow polish. I used Sally Hansen Whirlwind White.
Step 3- Do as I say, not as I do. Add one coat of yellow to the entire nail. I used Wet n Wild Spoiled Mind Your Own Beeswax. I only added the yellow halfway on the nail, but the orange/coral polish will cover better over yellow then it will white.
Step 4- Add a 2nd coat of yellow halfway up the nail.
Step 5- My only polish color that didn't have shimmer was the yellow. So I added a coat of Essie Pure Pearlfection halfway up the nail over the part that will remain yellow. If none of your polish colors have shimmer, wait until you are done with the yellow/orange/red gradient, and then add a coat of shimmer. You will want the entire gradient to have shimmer. This part will eventually become the fire.
Step 6- Sponge an orange or coral polish beginning half way and ending 3/4 of the way up the nail. I use a small section of a make-up sponge to do this. If the orange/coral ends up being sponged on the entire last 1/2 of the nail, that is perfectly fine. You will go over it with red anyway. I used Zoya Rica.
Step 7- Sponge a red polish onto the last 1/4 of the nail. I used Zoya Jade.
Step 8- Paint squiggles on the nail with a black polish. I used Wet n Wild Black Cream. Ideally you want a cream finish to contrast with the shimmery fire gradient. You can either use a dotting tool or a nail art brush to paint the squiggles. I used a dotting tool. When I was trying this out over an old manicure a few weeks ago, I used a art brush and that worked fine too.
Step 9- Paint black in a fine line along the edges and cuticle of the nail using either a dotting tool or a nail art brush. Paint closed any areas at the top (by cuticle) that seem like they should be connected. I connected a few too many squiggles. The video shows how to do step 8 and 9 and shows an alternate way to do a fire nail.
Step 10- Top coat. I used Seche Vite.
I'm obviously a nail art beginner (see above pictures :)). But, anything I can do, you can do. I have the art skills of a second grader. This looks complicated, but isn't. It does take a bit of time, but probably less then you think it will take. You could do this with other colors as a base (blues?) to look like cars or bikes painted with flames. And remember...
Pea Avocado Dip not totally unlike Guacamole
-
My sister posted these cute cranberry heart shaped cookies today. I
couldn't let her one up me, so I decided to actually get this post done.
What's that yo...




 I did these a few weeks ago when it was still summer. Every person who does nail art eventually has to do watermelon nails. It's the law. I started out with Wet 'n Wild French White Creme. I applied French manicure guides to the fingers. Then I sponged Wet 'n Wild Megalast Garden Hose (limited edition color) onto the thumb and tips of the nails with a make-up sponge. The next step was to use a dotting tool to make squiggly lines with Revlon Emerald City on the tips and thumb. I added a coat of Rimmel Speed Dating (very old red polish) to the bottom of the nails. Then removed the French tip guides.


 Posts
Posts


.jpg)